t.Home Custom Installation
Credentials
baseUrl: https://installer.a1apps.io
Authorization Type: Header
| key | value |
|---|---|
| x-api-key | apiKeyValue |
You can use custom postman collection by importing it from Custom setup.postman_collection.json file to send requests to installer.

Installation Steps
-
Get a link to download a template for assume role via a
GETrequest to{{baseUrl}}/environments/assumeroleUsing the link, download the template to your computer. -
Go to AWS Console - CloudFormation - Stacks - Create Stack - With new resources(standard). Please note that you need to be in the us-east-1 region.

-
Choose “Template is ready”, upload a
.yamltemplate file that you downloaded in step 1, and click “Next”. Entertibica-assume-roleas a stack name, click “Next” on the following two pages, put a checkbox nearI acknowledge that AWS CloudFormation might create IAM resources with custom namesand click Submit to start the stack creation process. -
When the stack creation is complete (you will see stack status
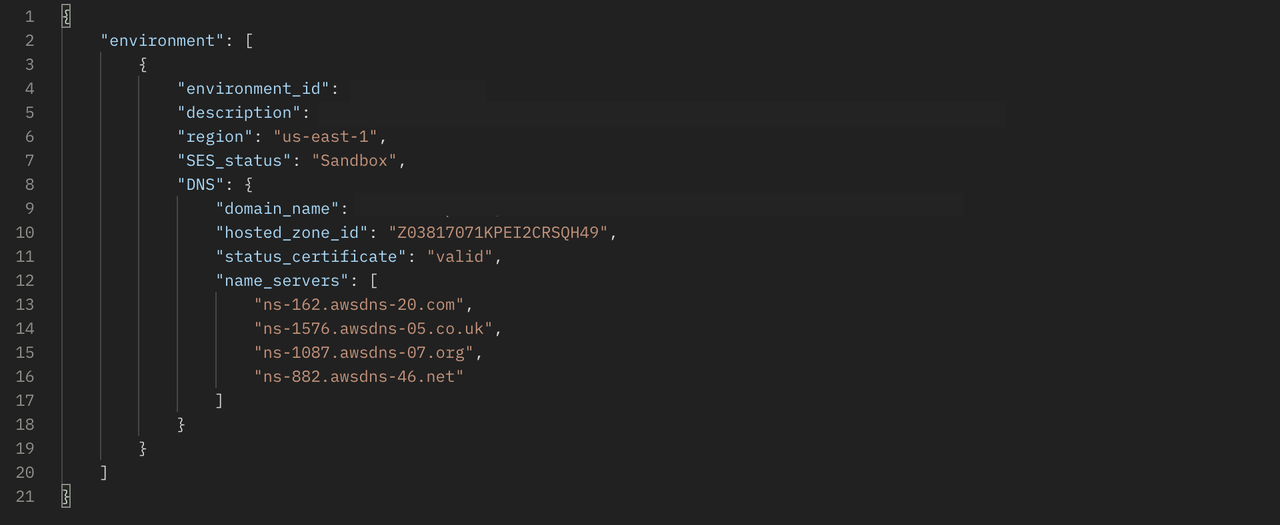
CREATE_COMPLETE), register your environment via aPOSTrequest at{{baseUrl}}/environments. Fill in the following fields in body (JSON):{"environment_id": "your_environment_id", // choose a name for your environment"domain_name": "your_domain_name", // use the domain you own"account_id": "your_12_digit_AWS_account_id","description": "description", // here you can provide details on what this environment is used for"region": "us-east-1"} -
Via a
GETrequest to{{baseUrl}}/environments/:environment_id(replace:environment_idwith the value you specified in step 4), receive information on your environment. It will include a list of Name Servers you will need in the next step as well as information on your SSL certificate verification.
- Add 4 name server (NS) records listed in the response from step 5 to your domain using your domain provider. If you are using a Route53 domain, go to Domains - Registered Domains. Select your domain and click
add or edit name serverson your right. If the domain you specified is a subdomain of another existing domain, follow the steps outlined in this manual.

-
Install environment base stack on your AWS account via a
POSTrequest to{{baseUrl}}/environments/:environment_id/env_base_stack(replace:environment_idwith the value you specified in step 4). You can leave the body empty for this request. Please wait until the status of the stack with the name beginning withtibica-base-stack-environment-in CloudFormation changes toCREATE_COMPLETE. You can also check the status via aGETrequest to{{baseUrl}}/environments/:environment_id/env_base_stack. -
In this step you will register a customer on your environment. Please note that to successfully create a customer in this step, you need to make sure that your SSL certificate is validated. The validation can take up to 30 minutes, and you can check the status by sending a
GETrequest to{{baseUrl}}/environments/:environment_id(status_certificatevalue) or going to Certificate Manager in your AWS account. Use the following body structure to register a customer via POST request to{{baseUrl}}/environments/:environment_id/customers:{"customer_id": "your_customer_id","alias_name": "optional_alias_name","root_path": true|false // choose true if you want to install customer on your root domain// or false if you want to use customer_id as a subdomain} -
This will create a stack in CloudFormation called tibica-basic-your_customer_id. You can check the stack creation progress in CloudFormation or by sending a
GETrequest to{{baseUrl}}/environments/:environment_id/customers/:customer_id. -
In the next step, we will install the app called customer home. This application can send emails notifying you about the status of installations. For this feature to be enabled, you need to have production access to Amazon Simple Email Service (SES). To request production access, go to your console and send a request. It may take up to 24 hours for AWS to process your request.

-
Once the setup is finished, deploy customer home via a POST request to
{{baseUrl}}/environments/:environment_id/customers/:customer_id/customer-home. This will install Customer Home with its dependencies. Replace:customer_idin the URL with the value you specified in step 7. Use the following body to send a request:{"host": "your_host", // normally it's 'customer_id.your_domain_name' but if you set root_path// value to true in step 7, the host is the same as your original domain name"root_path": "True"} -
You can check the stack creation progress in CloudFormation or by sending a
GETrequest to{{baseUrl}}/environments/:environment_id/customers/:customer_id/customer-home. -
After the Customer Home setup is complete, make a PUT request to
{{baseUrl}}/environments/:environment_id/customers/:customer_id/register_userto set up authorization in your workspace. Use the following body:{"companyName": "your_company_name","host": "your_host", // normally it's 'customer_id.your_domain_name' but if you set root_path// value to true in step 7, the host is the same as your original domain name"fullName": "your_full_name","email": "your_email","username": "your_login_username","password": "your_login_password"}
Once you receive a success message, you can now log into the application using the host name, username and password you specified.